
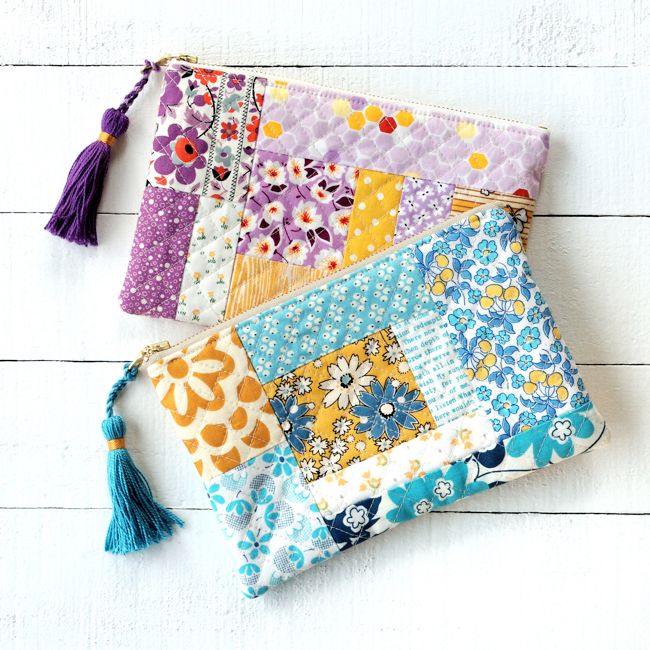
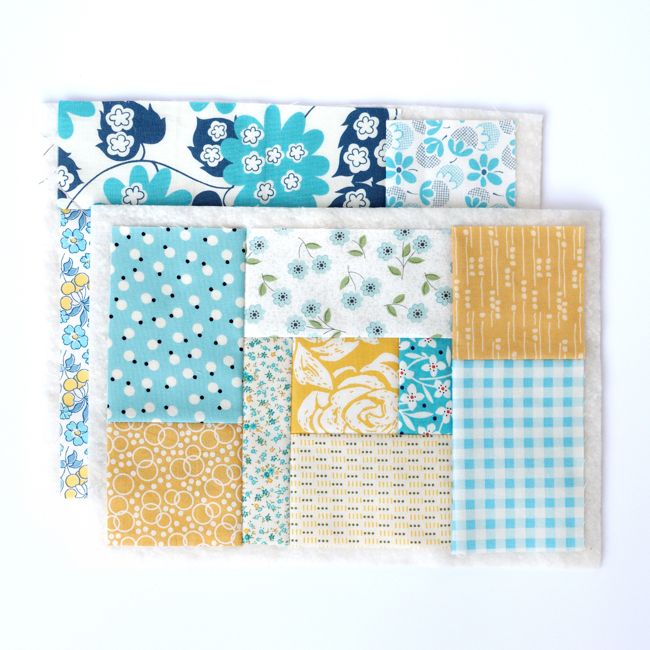
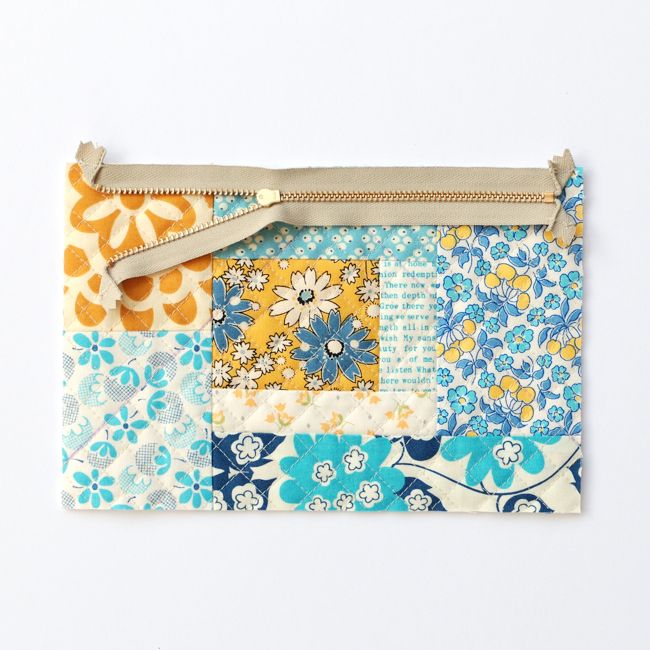
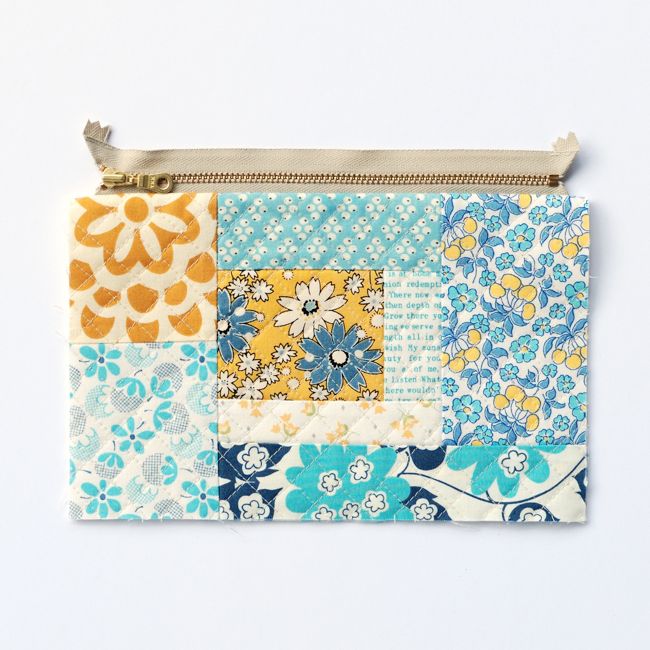
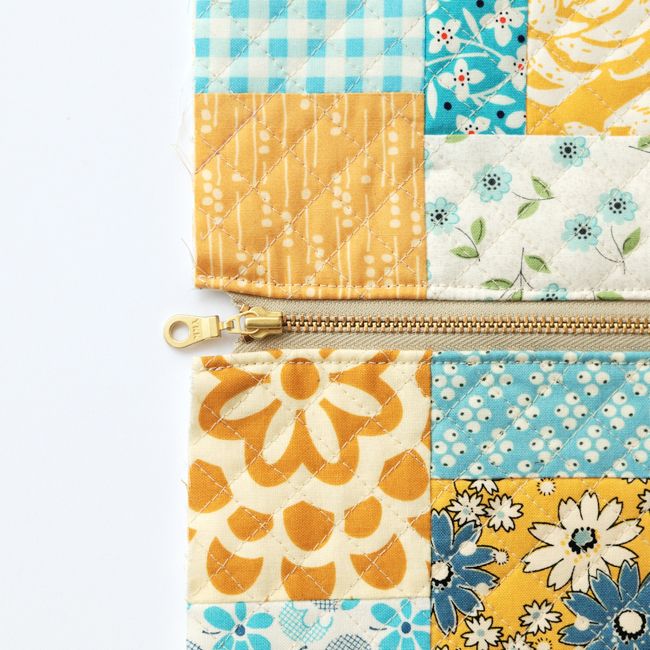
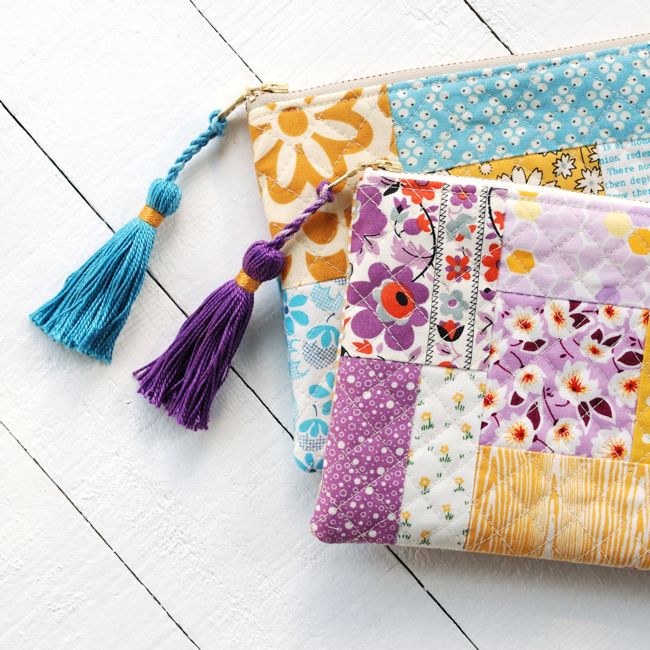
This is a fantastic project for orphan quilt blocks or improvisational patchwork. I love using metal zippers on these pouches since they have larger holes on the pulls—perfect for adding tassels!
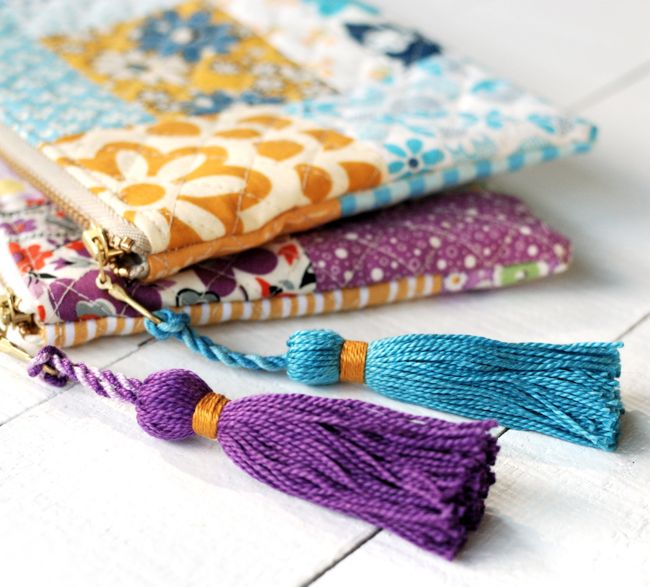
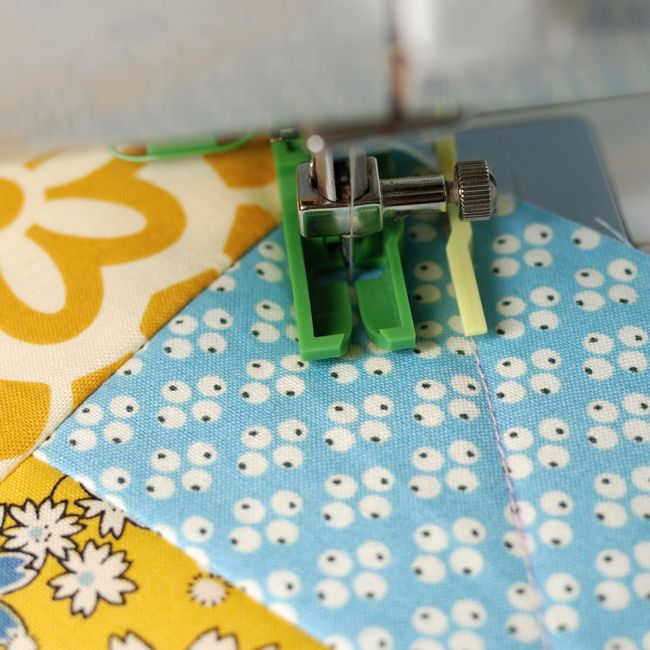
To make these pouches I used Clover's large Tassel Maker and the Ultimate Quilt 'n Stitch Presser Foot, which lets you quilt lines from 3/8" to 3" apart.


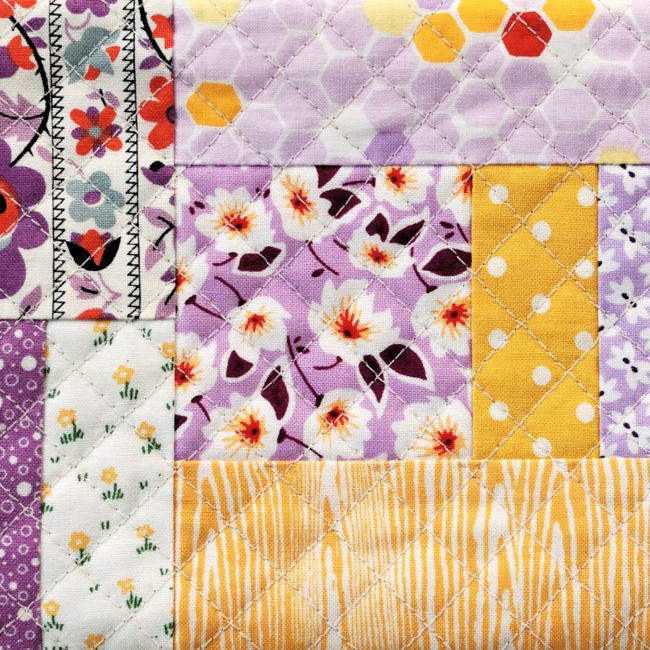
This presser foot made the quilting go so quickly! It was designed for low shank machines (see this post for information about the foot, and see this post to help determine if you have a low or high shank) so be sure to check to make sure that it will fit your machine.
The tassel maker, in addition to coming in super cute colors, is very easy to use; it only takes a couple of minutes to make each tassel!
Let's make some pouches!
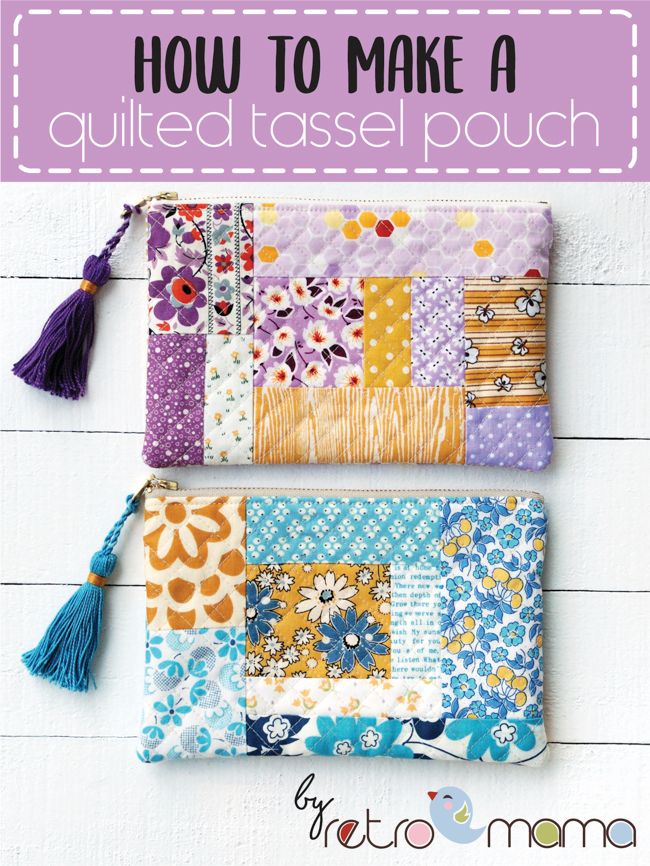
Quilted Tassel Pouch Tutorial
Finished pouch measures 8" x 5-1/2"
Materials
(2) Patchwork panels a little larger than 9" x 6"
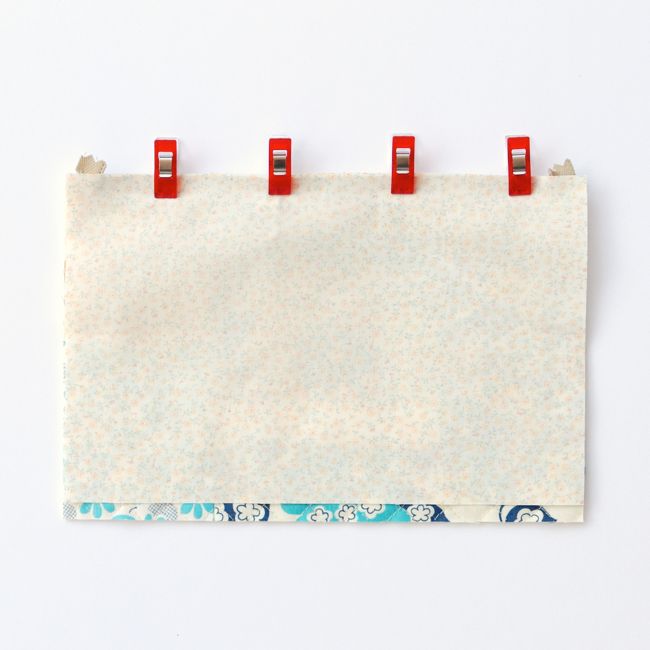
(2) Quilting cotton lining pieces* 9" x 5-3/4"
(2) Batting rectangles, slightly larger than the patchwork panels (I used needle punched cotton batting)
Thread
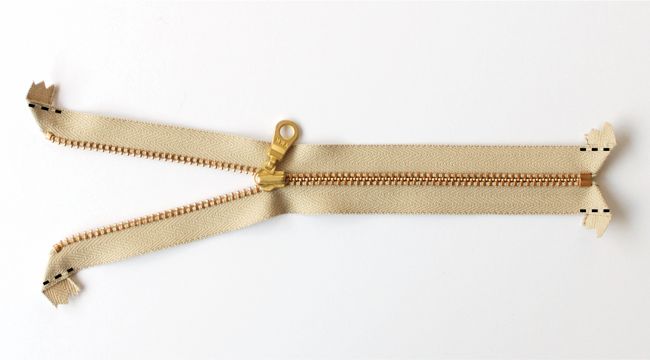
(1) 8" metal zipper with donut pull (like these; measure the actual zipper part only, do not include the fabric on the ends)
(1) Skein DMC Pearl Cotton embroidery thread; or one skein of each color that you will use
*Note: the lining is intentionally shorter than the outer panels so it will nest more neatly in the pouch!
Tools
Sewing machine and standard sewing/quilting supplies
Zipper foot
Erasable fabric pen
Ultimate Quilt 'n Stitch Presser Foot
Water soluble fabric glue pen
Large Tassel Maker
Pouch Instructions
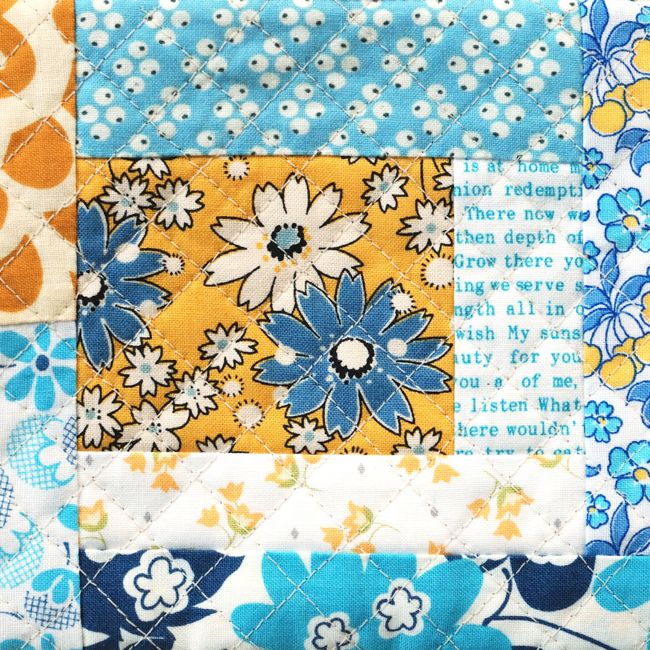
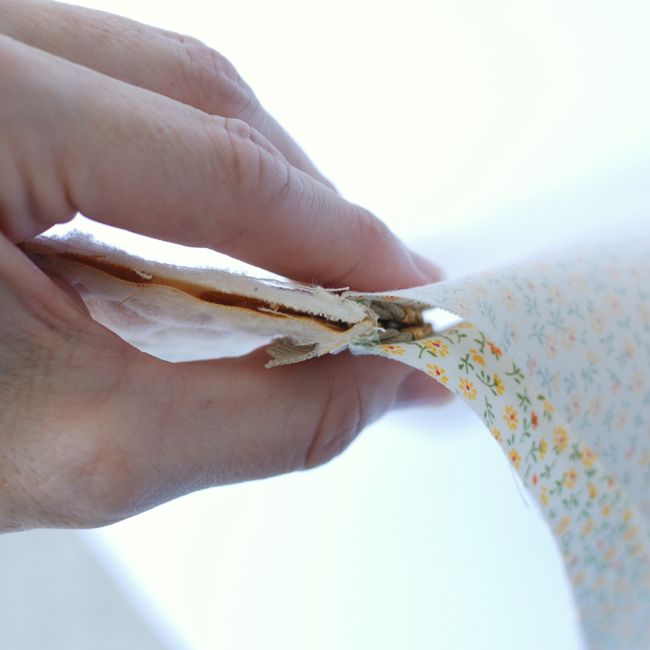
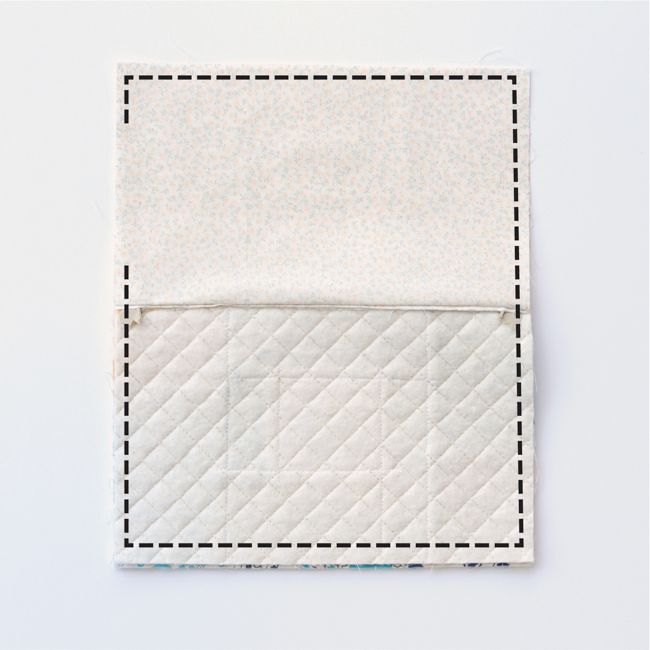
1. Center a patchwork panel on top of the batting, right side up, and press. Mark a 45 degree line with a fabric pen. Sew on the first line, then continue quilting lines 5/8" apart to cover the panel. Mark a 45 degree line in the opposite direction and continue quilting lines 5/8" apart. Repeat for the other panel. Trim the panels to 9" W x 6" H.
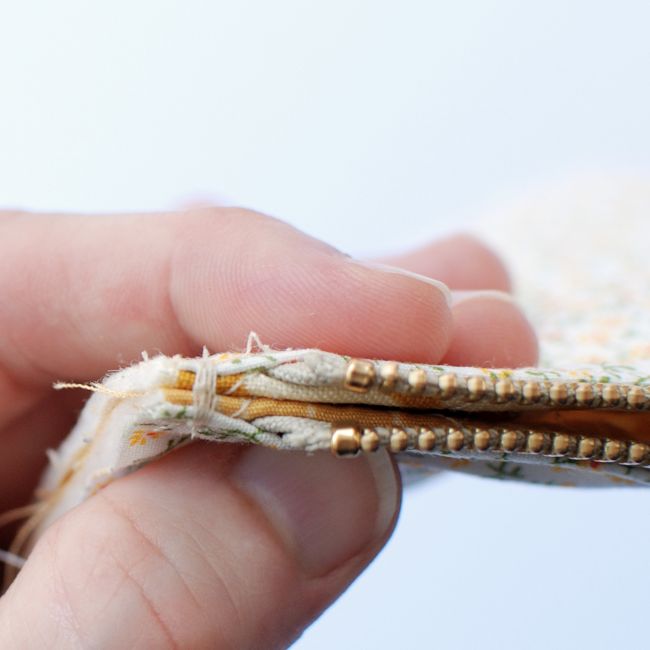
2. Press back the ends of the zipper as shown and sew in place, very close to the edge.
3. Place the front of the pouch right side up. Center the zipper on top of the panel, zipper pull facing down and closing to the left side. Line up the top edges and use fabric glue to affix the top edge of the zipper to the panel. Press with a warm iron until the glue is dry.
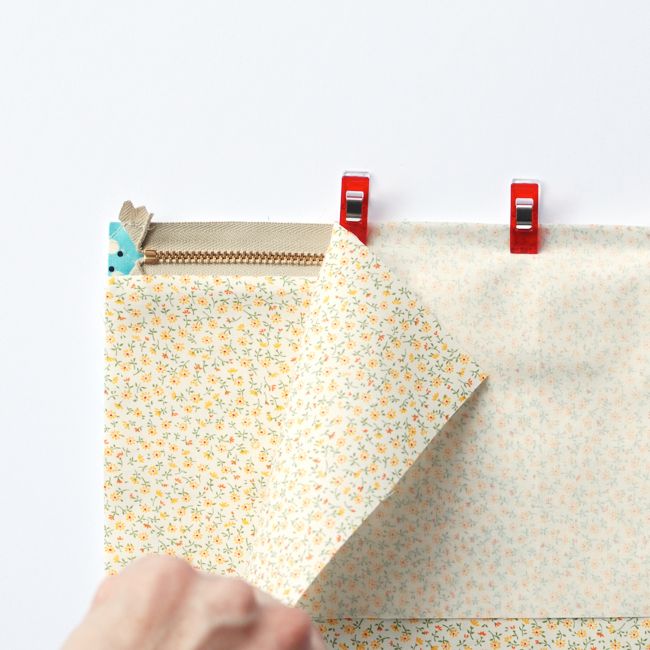
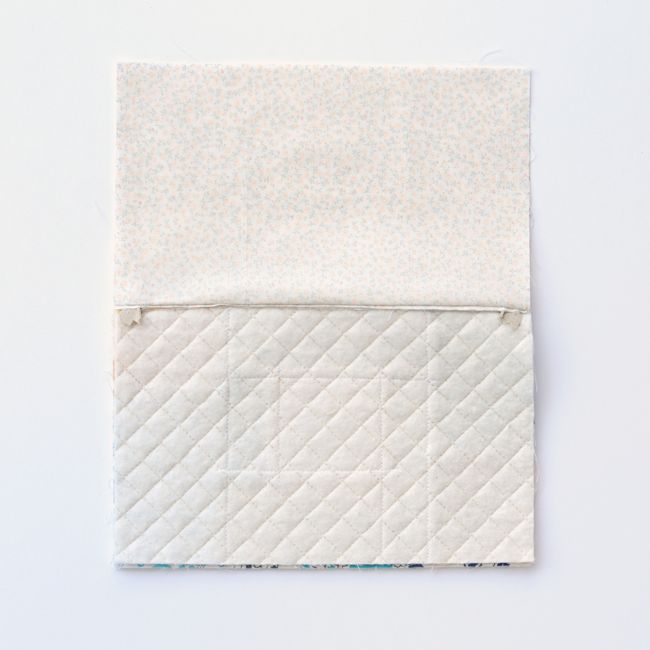
4. Place a lining piece on top of the zipper, right side down. Align the top and side edges with the panel and clip in place.
5. Using a zipper foot, sew across the top edge with a 1/4" seam allowance. Then fold the exterior panel and lining away from the zipper and press.
6. Place the second patchwork panel right side up. Place the first panel on top, right sides together and zipper at the top. Align the sides of the panels and use fabric glue to affix the zipper as you did in step 3. Place the other lining piece right side down and clip everything together along the top edge. Sew along this edge with a 1/4" seam allowance, then press the lining and panel away from the zipper.

7. Topstitch both sides of the zipper. Sew through both the outer panel and lining fabrics. Keep the lining smooth by gently pulling it away from the zipper while you sew.
8. Open the zipper 2/3 of the way. Fold the pouch in half, outer sides together, lining facing outward. Match the top of the panels next to the zipper so the fabric is even and tack together next to the edge. Repeat on other side of the zipper.
9.Match the exterior pieces right sides together and the lining pieces right sides together, and pin. IMPORTANT: Place the zipper on the lining side!
10. Triple stitch (also known as a stretch stitch) around the pouch with a 1/4" seam allowance, leaving a 3-1/2” section on one side of the lining open. I used the zipper foot when sewing next to the zipper, and a regular foot for the rest of the way around the pouch. Make sure there is some space between the seam and the closed end of the zipper so it will turn neatly. Clip the corners of the lining and the pouch exterior.
11. Turn the pouch right side out through the opening and use a chopstick or turning tool to gently push the corners out. Press the lining opening edges inward, then sew the lining closed.
12. Put the lining back into the pouch and press.
Tassel Instructions
Before wrapping the tassel, cut the following three pieces:
(1) 10" length of twine for hanger (I used homemade twine)
(1) 10" length of matching pearl cotton thread for tying the center of the tassel
(1) 20" length of contrasting pearl cotton thread for wrapping the tassel head
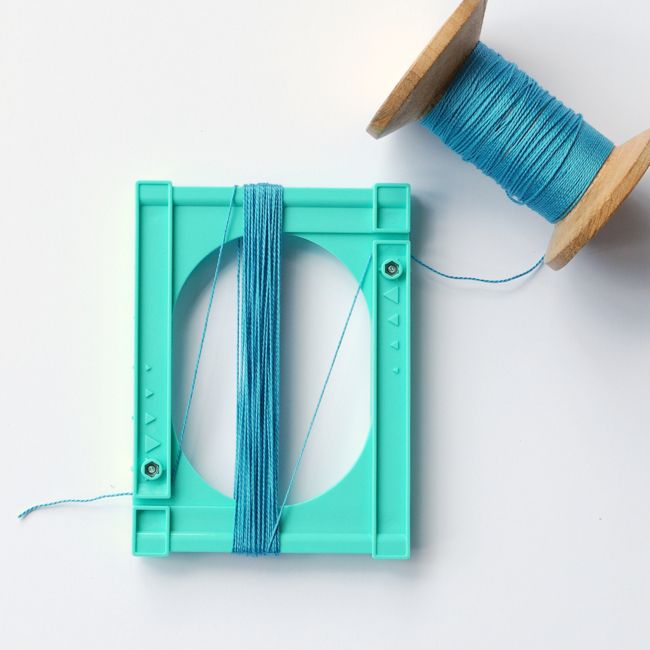
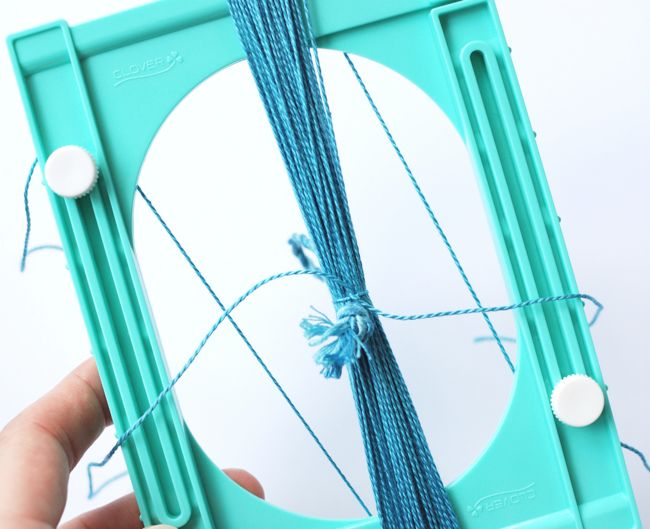
1. Secure one end of the pearl cotton under the notch on the side of the large tassel maker (I used the smallest setting), then wrap the thread around the center of the bars 35 times (a little less than half the skein). Secure the end of the thread under the notch on the other side and trim.
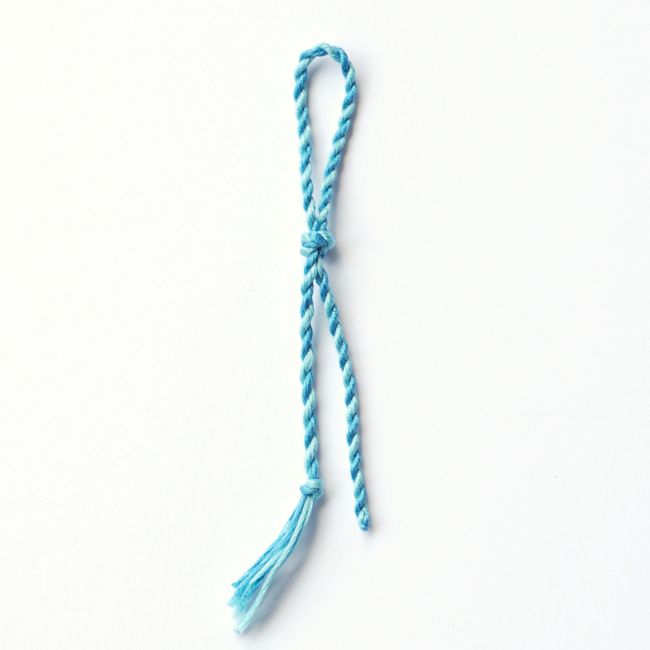
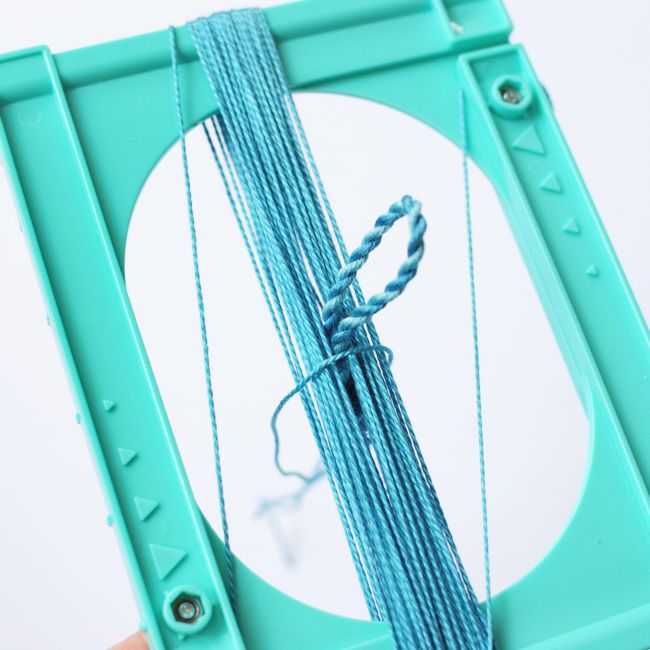
2. Fold the hanger twine in half and the ends into a secure knot about 1-1/2" from the bend, Then trim the ends fairly short. Insert the knot all the way through the center of the wrapped thread, with the knot slightly more than 1/2 of the way down from the top bar.
3. Tie a tight and secure knot around the center of the wrapped thread with the 10" piece of matching thread, ABOVE the knot in your hanger, placing the knot on the underside, next to the hanger knot.
4. Trim the wrapped thread along the top and bottom of the tassel maker with sharp shears. Allow the strands to drape around the hanger.
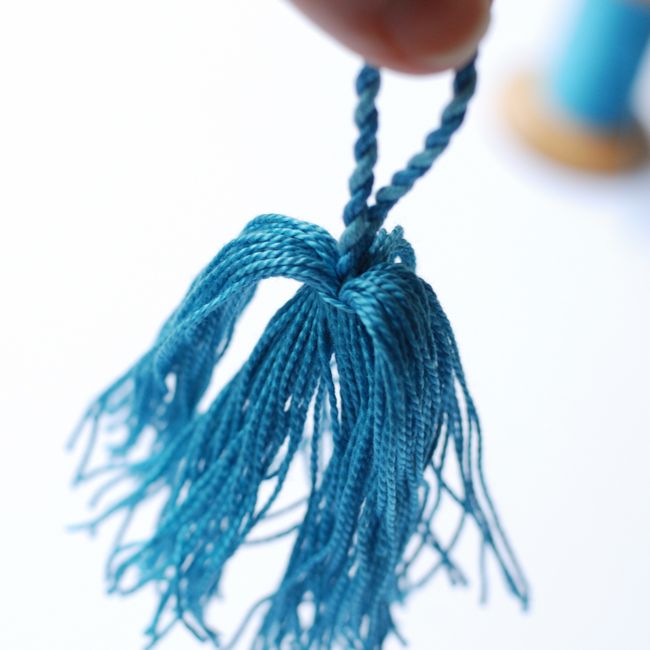
5. Make a loop with your 20" length of contrasting thread, then tightly wrap the head of the tassel (I wrapped it about 8-9 times), insert the end through the loop, and pull both ends until the loop disappears under the wrapping and feels firmly in place. Trim the ends of the wrapped thread.
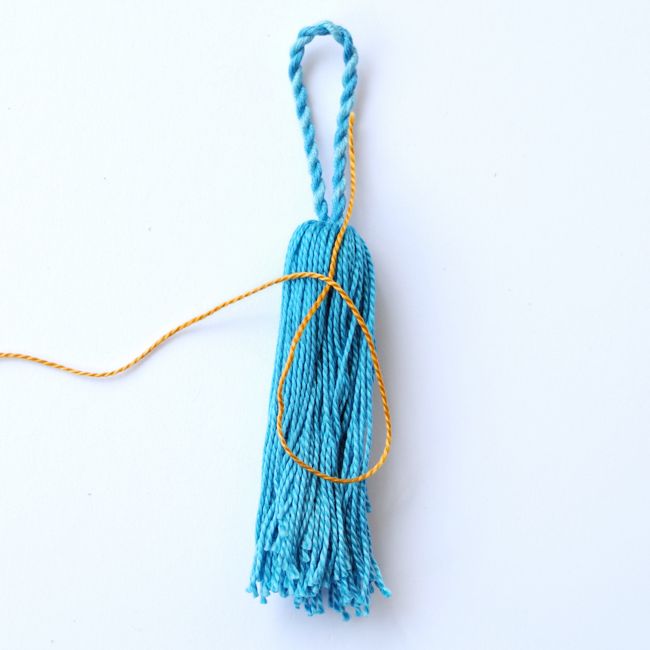
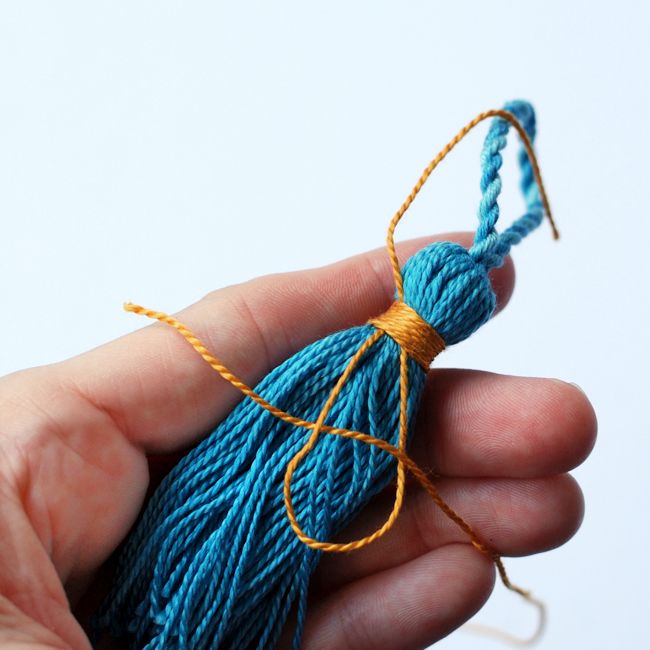
6. Trim the ends of the tassel with sharp shears so the strands are even.
7. Place the tassel hanger through the hole in the zipper pull, then thread the tassel through the loop.
I hope you have fun stitching up your own quilted tassel pouches, please let me know if you have any questions below!
Happy Stitching,
Kim
You have got me in a pouch-making mood! I love these! Anything I can make using up favorite scraps is a winner. Plus, with the tassel, they make awesome gifts for a special friend. Thank you!
ReplyDeleteYay!! Scrap-busting projects are my favorite! Enjoy!! :)
DeleteThese look fabulous, thank you for the tutorial. x
ReplyDeleteYou're very welcome!! :)
DeleteDo you have a tutorial on making the homemade hanger twine?
ReplyDeleteI don't have a tutorial for twine but that is a good idea! xo
DeleteI'd also like to learn how to make twine-PLEASE!
DeleteWow! I just discovered you and noticed immediately that you were using metal zippers. I was recently gifted with a large bag of metal zips; I knew that I would find a home for them, but so soon? Thank you for this tutorial and all of the others that I see listed for later. Stay well and stay safe. pj!
ReplyDeleteP.S. I am lovingly referred to as "the mama;" the child is now 48. I love it...because I'm the mama!
Well isn't that some perfect timing!! Congrats on your fab gift--I love making pouches with metal zips, they have such a professional look and feel :) Your nickname is the sweetest! Take care and Happy Sewing!
DeleteMy patchwork was pretty busy with smaller pieces so I quilted it farther apart. I tried 3/4” apart on one side of the bag, and 1” on the other side. I like the 1” spacing best.
ReplyDelete.
I'm glad you found spacing that works for you! I find that to be one of the toughest decisions on quilted projects--it can really change the whole look!
DeleteThis the best tutorial for making tassels!!
ReplyDeleteThis is the best tutorial I have seen for making tassels! Thank you for sharing.
ReplyDeleteGorgeous pouches!
ReplyDeleteI love it!
ReplyDeleteI love these! great work! I've been looking for inspiration and this is it!
ReplyDelete