

I know. It's not even Halloween yet and this is looking very Christmassy. What can I say, Christmas is my favorite holiday, and when we're all coming down from our candy buzzes in a few days, it will be time to kick into all-out holiday crafting mode, so why not get a head start?
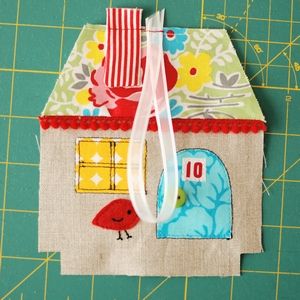
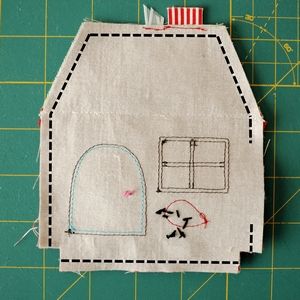
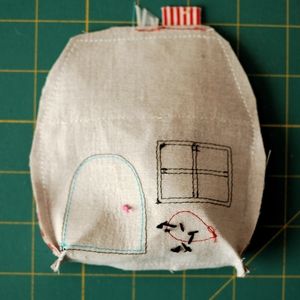
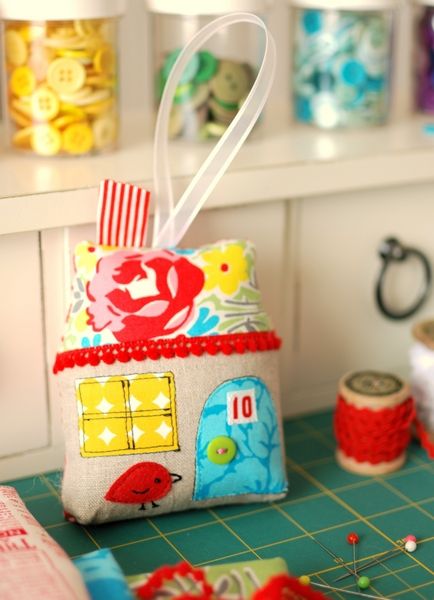
Don't you love a cute house ornament? I made a little fabric house last year, but it bugged me that the door and embroidery disappeared into the bottom of the house (Exhibit A), so I changed the design to avoid that problem. These scrappy house ornaments don't take very long to make, and they do include a hanger, I just tucked them under for the photo above. I mentioned before that I was in the mood for a tutorial, well...here it is!
Fabric House Ornament Tutorial
Materials:
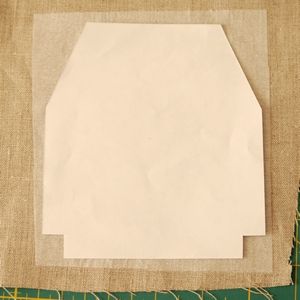
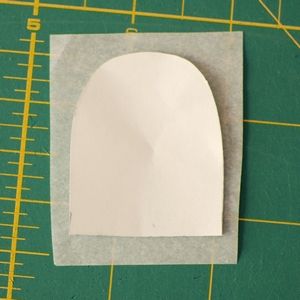
Pattern (click here to get pattern)
Quilting cotton scraps for house back, roof, window, and door
Fabric with numbers or fabric selvage for house number
Linen, linen/cotton blend, or cotton quilter’s linen for house front
Wool or wool-blend felt scraps for bird
10” length of ribbon, 3/8” to 1/2" wide (satin, grosgrain, velveteen, picot edge, twill tape, etc.)
Rick rack (1/2" wide), miniature pom pom, or other trim
Wonder Under fusible web (1/8 yard)
Sheer weight or lightweight fusible interfacing (1/8 yard)
All purpose thread
Embroidery thread
Button
Polyfill or other stuffing material
Tools:
Scissors, rotary cutter/quilting ruler/cutting mat (optional), sewing machine, iron/ironing board, pins, seam ripper, hand sewing needle, disappearing fabric ink, chopstick or turning tool
*Seam allowances are 1/4" unless otherwise noted, finished house is 4-1/2" tall, not including chimney.
*Always backstitch/backtack at the beginning and end of each seam.
Instructions:
HOUSE
1. Cut a piece of fusible interfacing slightly larger than the house pattern piece. Fuse the interfacing to the wrong side of the linen with a hot iron according to package instructions. Press with iron on the linen side until the interfacing is completely fused. Use a ruler and rotary cutter to cut around the house pattern.
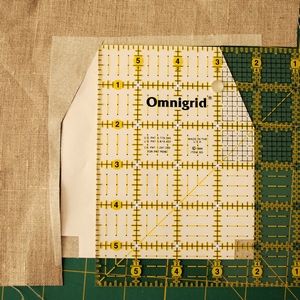
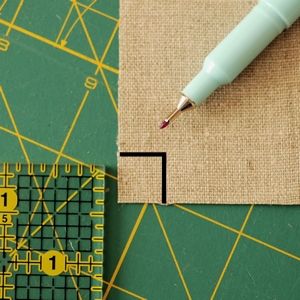
2. Draw the cutouts at the bottom of the house with disappearing fabric ink (the cutouts are 1/2" x 1/2"). Cut on the lines with scissors. Cut another house from quilting cotton (there is no need for interfacing for the cotton house).
ROOF
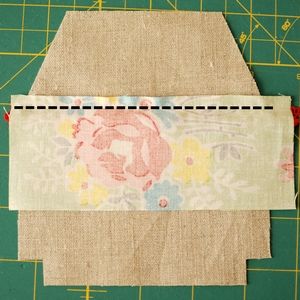
1. Place a length of rick rack or pom pom trim on the linen house fabric, indicated on the pattern with a dotted stitch line. Center the trim over the line. I find it helpful to draw a line with a fabric pen 1-3/4" from the top of the house (the solid line on the roof of the house pattern). The top of your medium sized rick rack should meet this line, as well as the roof fabric when you place it over the rick rack (see Step 2). Mini pom pom is a little narrower than rick rack, and so sits a little lower than 1-3/4".
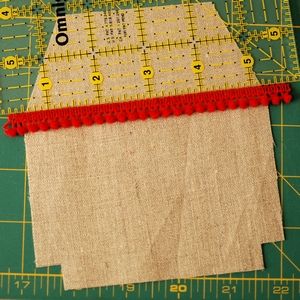
2. Place the roof fabric on top of the trim, right sides together, with the edge of the fabric 1/4” above the stitch line. Sew a 1/4” seam along the stitch line.
3. Fold the roof fabric up. If you use rick rack, go ahead and iron the fabric. If you are using pom pom trim or other synthetic trim DO NOT PRESS WITH IRON!!! Pom pom trim melts very easily. Finger press the fabric only.
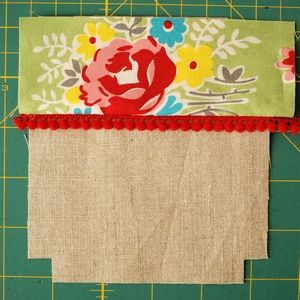
4. Turn the house over, and trim the roof fabric to match the outline of the house.
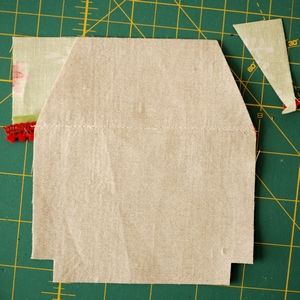
5. Turn the house back over and machine baste the roof fabric in place, very close to the edge of the house.
DOOR, WINDOW, & HOUSE NUMBER
1. Cut a piece of Wonder Under slightly larger than the appliqué piece.
2. Adhere the Wonder Under to the wrong side of the appliqué fabric with an iron (bumpy side of Wonder Under to wrong side of fabric). Let cool. Lift up an edge of the paper backing to loosen it from fabric.
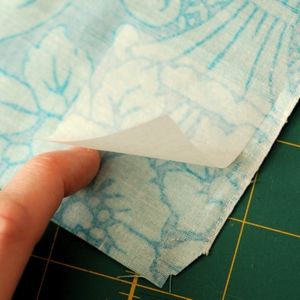
3. Cut out the piece of fabric that is fused to the Wonder Under.
4. Remove the paper backing from the fabric. Place the pattern piece on the sticky side of the fabric and cut around it.
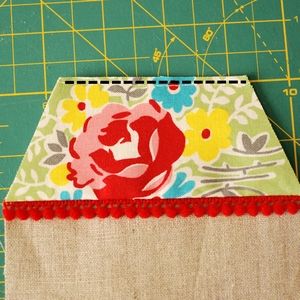
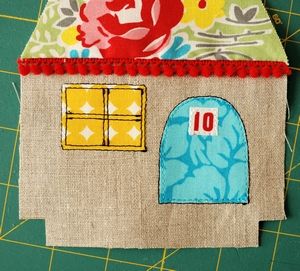
5. Remove the pattern and iron the appliqué in place on the front of the house. Do this for the window, door, and house number, using the pattern as a guide for placement. DO NOT decorate your house below the line marked on the pattern, and remember to keep the iron away from any heat-sensitive trims!
5. Using a straight stitch on your machine, sew around the outside edge of the appliqué, just off the fabric edge. Sew a second line just on the inside of the fabric edge. For the door, I used thread that matched the door on the inside of the fabric, black on the outside. For the window, I used black thread only. I sewed pretty fast, not aiming for a super straight line, I like the hand drawn look of wobbly lines. For the house number, I only sewed one seam, on the inside of the fabric edge.
BIRD
1. Cut a bird from felt and place it on the house. Sew in place by machine with matching thread, just on the inside edge of the felt.
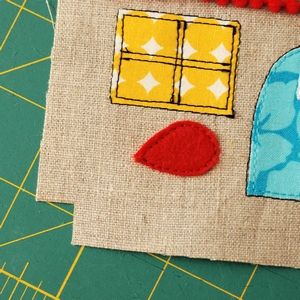
2. Divide the embroidery floss and use three strands for the bird. Hand embroider beak, feet, and wing with backstitches.

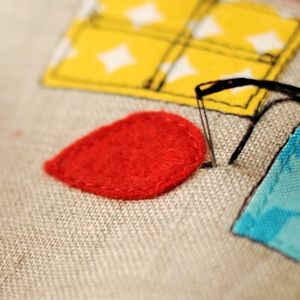
3. Make a French knot eye.


BUTTON DOORKNOB
1. Add the button last so you don't have to worry about bumping into it while sewing the birdie or other appliqués.
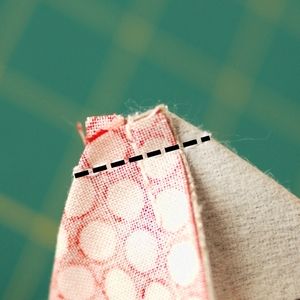
CHIMNEY & HANGER
1. Fold chimney fabric in half. Sew across the top and down the side with the raw edges.
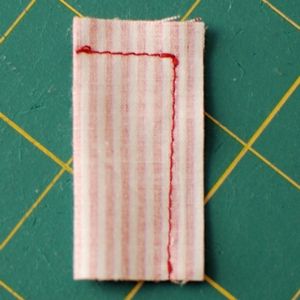
2. Trim corner and seam allowances.
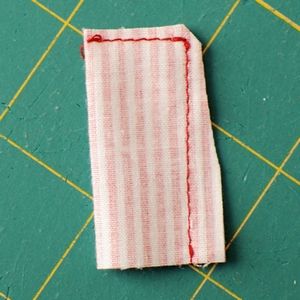
3. Turn right side out and press.
4. Place chimney upside down where indicated on the pattern, right sides together. Sew in place very close to the edge of the fabric. Fold ribbon hanger in half, place on the top and center of the roof and sew in place very close to the edge.
5. Alternate method: you may press under the top and side edges of the chimney fabric 1/4", right sides facing out, and hand sew the chimney closed with a ladder/blind stitch before attaching to house.
FINISH
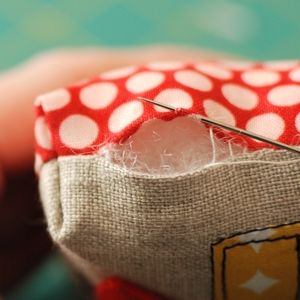
1. Place the front and back of your house right sides together and pin. Make sure your ribbon will not get sewn into the seams. Sew around the bottom, sides and top of the house, leaving a 1-1/2” turning hole on one side. DO NOT sew the notched cutouts yet.
2. Reach inside the house to pull open the cutout on one side. Flatten it so the seams match up, and the seam allowances go in opposite directions. Sew across this short straight edge with a 1/4” seam allowance. Repeat for other side. Make sure the seam allowance on the bottom of the house is folded the same direction on both sides.

3. Turn the house right side out, stuff, and close the turning hole with a ladder stitch.
4. You're finished! Hang your ornament on a tree, doorknob, wall or stocking hook.
Happy homemaking!
Kim
P.S. The number fabric is Annie's Farm Stand Seed Catalog from Lakehouse. It has lots of different numbers in several fonts and sizes, perfect if you're going to make a bunch of these.
P.P.S.
P.P.P.S.
UPDATE: just editing my sale and shop info, so as not to be confusing :)


Ой какие домики!!!!Super!!!
ReplyDeleteWow, I cannot even begin to tell you how adorable these little ornaments are!
ReplyDeleteConnie
these are so sweet kim, so perfect for using scraps that you just can't part with!
ReplyDeleteThanks for sharing, Kim - I'll be making some of these! x
ReplyDeleteWauw!! Thank you SO much, I love it.
ReplyDeleteSo, so adorable!!!
ReplyDeleteWell, this is about the cutest thing ever. I'm definitely going to give this a try!
ReplyDeleteThese are so cute!! Thanks so much for the tutorial. Bookmarking for post candy merry making. :)
ReplyDeleteReally cute! Thanks for the tutorial. found you on Pinterest.
ReplyDeleteThanks, everyone! Oh, don't you just love love love Pinterest?
ReplyDeleteReally cute :-)
ReplyDeleteohhhh, love that little houses! thank you very much for sharing the tutorial, I think, I'll try to sew at least one =)
ReplyDeletethese are super cute! I may have to put them on my Xmas To Do list :D Thanks so much for sharing
ReplyDeleteOhhhhhhhhhhh I love this houses thanks for sharing!!
ReplyDelete♥kisses from Argentina
Love, love love this. Can't wait to try it. Great tutorial -already on my pinterest board!
ReplyDeleteThese are just so sweet! Thanks so much for sharing:)
ReplyDelete~Shelly
http://www.gingermelondolls.blogspot.com/
Oooh!!! SO cute! And I definitely making one (at least) of these!
ReplyDeleteTooo cute!!! I'm signing up to become a stalker: oops, I mean follower :-)
ReplyDeleteThese are soooo stinkin' cute!
ReplyDeleteThey are making me so happy just looking at them. Think of what it would be like if I were holding one. ******dreaming *******
hugs
Love these cuties !!
ReplyDeleteThese are so cute!
ReplyDeleteDang. Something else I have to make! Thanks a bunch for sharing!
ReplyDeletebellissima.... grazie 1000
ReplyDeleteciao Stefania
thank you a squillion times over. i love this project!
ReplyDeleteThanks for the wonderful tute! You so rock... Those houses are darling!
ReplyDeleteside note...i am in Fort Wayne...Id love it if we were neighbors!?
ReplyDeleteThis is the first time I've liked a handmade holiday ornament. Lovey-love-love! I'll add this on my list of to-dos! Thanks for the great tute!
ReplyDeleteLove these! Am your newest follower :) Now I just have to find the time and patience to make these ;)
ReplyDeletevery, very nice!
ReplyDeletemmmmm thanks for this tutorial!! I love it!! Kisses
ReplyDeleteGorgeous! Now to see if a non sewer like me can recreate the same gorgeousness?
ReplyDeleteThese are so cute! What a pile of work you put into the tutorial!
ReplyDeletethanks for the great tutorial for the cute little houses!! They are adoreable!!
ReplyDeleteHi Kim!
ReplyDeleteI love these little houses.
Wonderful work.
Thanks for the tutorial.
Hugs and Kisses,
Sandra
Thanks for the wonderful tutorial.
ReplyDeleteSO cute!!!! thank you for a great tutorial
ReplyDeleteHi Kim !!!
ReplyDeleteI love this little houses. Thanks for the tutorial.
Kisses
Ana
Thank you ! I love it !!
ReplyDeleteMerci beaucoup pour ce tuto ♥♥
Thanks a million - this is so cute! So so cute! Greetings from Germany
ReplyDeletelove.
ReplyDeleteI am new to sewing, so i hope that this isn't over my head...but i am so in love with these little houses!
Thank you for the tutorial!
Super super cute thanks for sharing great tutorial xxx
ReplyDeleteDone !
ReplyDeleteI made one yesterday, I love it ! (Tomorow on my blog : http://sophiebonheur.canalblog.com)
Thanks a lot one more time !
C'est fait !
J'en ai fait une hier, j'adore !!
Totally adorable!
ReplyDeleteThese are just adorable! I will be featuring them in a post on Tuesday. I hope you do not mind. I am sharing one picture and a link directly back to this post. Thank you for this fabulous tutorial!
ReplyDeletethese are fantastic! thanks for sharing a tutorial.
ReplyDeletewaaaaay too adorable!
ReplyDeleteOh my goodness! These are just so cute, thanks for sharing
ReplyDeleteWonderful little houses!
ReplyDeleteThanks for sharing!
So cute. I love love love your style!
ReplyDeleteVanessa
Lella Boutique
http://lellaboutique.blogspot.com
Wow! Thanks for this tutorial!! These little houses are really cute!! :)
ReplyDeleteToo cute! Thanks!
ReplyDeleteSuper tutorial! Thanks
ReplyDeleteSEW beautiful! Thanks for sharing!
ReplyDeleteThanks for the tutorial. This is soo great, I'll try it!
ReplyDeleteOh MY.
ReplyDeleteThis is too gorgeous.
I just can't stand it!!!
Really, I LOVE it soooo much!!!
I LOVE houses, I LOVE birdies, and your ornaments drive me crazy with all their adorableness!!!
Thank you so so so very much for sharing this fantastic tutorial!
(I fell in love with you a bit...)
♥!!!!
ohhh thank you
ReplyDeleteGreat tutorial¡¡
xxoo
marieta
lindas as casinhas amei
ReplyDeletebjinhossssss!!!!!!!!!
Wow I have just popped over from Craft Gossip. Thank you so much for this lovely tutorial. I have now become a follower of your blog, it is so pretty and inspirational.
ReplyDeletetwiggy x
Love, love, LOVE! I've just discovered your blog through craftgossip. Looking forward to having a look around.
ReplyDeleteLovvve these sweet homes, I took to my sewing list :)
ReplyDeleteI'm a pretty inexperienced appliquer, so please forgive me if this seems silly, but I have one question...why do you put iron-on on the whole house back? Is it just to stiffen the fabric?
ReplyDeleteHi Michelle, thanks for your question! The interfacing does a couple of things: it adds some stability to the fabric for the embroidery and applique, and because linen tends to be a bit “wobbly” (it shifts and warps when you cut and sew with it), I find it easier to work with when it has interfacing on the back. Also, because linens have a looser weave, the interfacing adds some structure and helps keep the linen from getting too lumpy and losing its shape when you stuff the house. Hope that helps!
ReplyDeleteHoy descubri tu blog, me encanto esta casita te mando un beso enorme. PATRICIA DE RIO GRANDE, T. DEL FUEGO ARGENTINA
ReplyDeleteLove this! I made one and linked up. Thanks for a fabulous tutorial!!
ReplyDeleteAnna
Yards and Yards
http://yardsandyards.blogspot.com/2011/11/make-yourself-at-home.html
This is adorable and your instructions are excellent! Thank you. I've just finished making one and love it although it's not nearly as cute as yours ... I'm hoping practice will make perfect.
ReplyDeleteI love this! I featured it on my blog, here: http://punkprojects.blogspot.com/2011/11/make-it-monday.html
ReplyDeleteThese are super cute! I'm thinking that if you enlarge the pattern you can make a lovely pillow!
ReplyDeleteAwesome. We posted this on our face book. Hopefully you will get some great feedback. I cant wait to make some. thank you for sharing.
ReplyDeleteThanks so much, Katie and Calico house!
ReplyDeleteVery cute, nice tutorial! Thanks for sharing!
ReplyDeleteWOW! love your little houses and thanks so much for sharing the tutorial. your fabrics are great and really make the house.
ReplyDeleteLOVE! Thank you for this great tutorial!
ReplyDeleteThank you for the great tutorial! The houses are just adorable and i will be making a mini version as a key ring for Christmas for my mum!
ReplyDeleteSo, so gorgeous. I love everything about these little houses. Thank you for a great tutorial... I think I will be making some of these tonight.
ReplyDeletehow cute !
ReplyDeleteThese little house are so beautiful, Kim. I hope you don't mind I posted them in my blog. If you want to see, here's the link
ReplyDeletehttp://catarinaregina.blogspot.com/2011/10/retalinhos.html
muchas gracias¡¡¡¡¡
ReplyDeleteThese are gorgeous! I've taken the liberty of adding a link to your tutorial in my advent calendar blog widget, here: http://freeadventcalendar.blogspot.com/2011/12/w-i-n-d-o-w-o-n-e-scrappy-house.html. Hope you approve x
ReplyDeleteThis is a delight to make and the tutorial is so clear to follow. Thanks so much.
ReplyDeleteHola Kim, bellisimo tu blo!!! ya te sigo, me gustó mucho esta casita!! yo también amo la navidad!! besos desde Argentina
ReplyDeleteThank you for the lovely house and the tutorial! In fact, I made it into an Advent calendar for my three-year-old, and she's loving it. If you want to see it: http://retro-mama.blogspot.com/2011/10/home-for-holidays.html
ReplyDeleteThanks againe,
SAbine
Do you have any more of these??? I wish I had seen these sooner? Our home went into foreclosure this year and somehow God saved it for us and I would love to gift each of my children one of these as a reminder of God's promises, but at 9 months pregnant I do not think I would have the motivation :( please e-mail me at wilkinson6282@roadrunner.com if you have any!
ReplyDeleteYou should really sell these...I checked your etsy shop but saw nothing there. I would buy 9 just as you have in the picture, They are gorgeous!!!
ReplyDeleteOkay, I am DYING over these! Look how cute they are! ^_^ Love.
ReplyDeleteI absolutely love these! And so well explained, thank you for sharing!
ReplyDeleteI just found your adorable little houses on the OnePrettyThing Blog http://www.oneprettything.com/ They're just so, so sweet!
ReplyDeleteThese are adorable! I love the wood grain fabric door and all the little birds!
ReplyDeleteThese are adorable, thank you for the lovely tutorial you're very generous with your time and knowledge. :)
ReplyDeleteAbsolutely love these! After making a teensy house (to use as a lavender sachet) on my own, struggling all the way and gnashing my teeth when the bottom of the door turned under, I've now printed your pattern and instructions and am going to give it another go.
ReplyDeleteThanks for sharing your talents!
Wow! So,so cute! I love these little houses, I'll try one! Thanks 4 the tutorial! I invite you to visit my blog and, if you want, you could be my follower, I'll be so glad :-) http://incantodifata.blogspot.com/
ReplyDeleteHappy new year 2012,
By Annalisa from Italy
Truly amazing! Thank you for tutorial!
ReplyDeleteSuzana
So adorable!!!
ReplyDeleteTotally sweet. Great tutorial. Well done! Birgitte
ReplyDeleteI love this tutorial so much that I was crazy enough to make 5 houses!! haha :). I blogged about it and linked to your tutorial :)
ReplyDeletehttp://neenkster.com/2012/01/little-fabric-houses-for-oma/
What a great tutorial and an adorable house. I love it! Thank you!
ReplyDeletelovely pattern,thank,perfect!! bjo
ReplyDeletehermela cris
Wonderful tutorial! Thanks so much for sharing. I "pinned" this so I can trythem myself.
ReplyDeleteдомики чудесные! спасибо за МК!
ReplyDeleteThanks so much for the wonderful, cute little house tutorial. I've just made one and it was so much fun. :)
ReplyDeletemeu Deus cada coisa espetacular q trabalho maravilhoso!!!!!!!!!!! A casinha é linda, a coruja é a cara da minha irmã, encantadora ...to apaixonada.
ReplyDeleteso cute!
ReplyDeleteThank you very much! great idea and great design!!
ReplyDeleteThanks for tutorial! These are so cut!
ReplyDeleteThese are so adorable! I already made three during the last two days. I think they are perfect for spring!
ReplyDeleteThank you so much for sharing this tutorial!! I love so much your job, is excellent!!!
ReplyDeleteMy best wishes,
And another cute house... for Easter this time http://sophiebonheur.canalblog.com/archives/2012/03/21/23821646.html
ReplyDeletethanks a lot ♥♥♥
This is just adorable, hope I'll make it to X-mas! ;)))
ReplyDeleteThank you for share...I made one and I'm in love.
ReplyDeleteI put a link back to your blog, hope you don't mind.
thanks again :)
Merci beaucoup pour ce gentil tuto que j'ai fait avec grand plaisir.
ReplyDeleteJe vous mets sur mon blog en France.
Bisous
PRECIOSASSSSSSSSSSSSSSSS!!!!!!!!!!!!!
ReplyDeletegrazie sono bellissime e deliziosi i colori un bacio Vanda
ReplyDeletegrazie per le meravigliose creazioni che fai...sicuramente diventerà uno dei miei siti preferiti ....
ReplyDeletemiriam
sei bravissima ...grazie del tutorial
ReplyDeleteun bacine
miriam
ola, conheci seu blog e adorei seus trabalhos são lindos, obrigada por compartilhar os paps, já estou te seguindo e a convido para conhecer meu blog e se tornar minha seguidora, abraços
ReplyDeletewow these are really lovely!
ReplyDeleteThese little houses are so cute Kim and I would love to make some however I cannot see the pattern anywhere, please let me know where I can download the pattern pieces. Thankyou
ReplyDeleteis it early if i start sewing? :D i want a whole lot, maybe give as small gifts or better yet instead of gift tags.. god i usually feel christmassy earlier than most but this year it is outrageous! :P
ReplyDeletedecodeniquo.blogspot.com
I wanna show you something: http://www.altincicadde.com/kampanya/nihalce-10010
ReplyDeleteThis so called brand sells plush homes exactly the same designs as you did here. I believe a design showed/shared should only be used as a reference. And selling it & making profit from it? Unacceptable for me.
I'm just informing you...
Hi Kim,
ReplyDeleteI have a big passion for little houses and those are really adorable!!!Thank you so much for sharing this amazing tutorial. I love your blog, your Greta doll are so sweet. I'm your new follower.
Have a look at my blog I’ll be so glad.
Hugs from Portugal
Ana Love Craft
www.lovecraft2012.blogspot.com
Adorei, parabéns
ReplyDeleteThank you for the wonderful idea! I tried to make my 3 little houses too. You can see the result here in my blog
ReplyDeletehttp://funny-life-blog.blogspot.com
Your little houses are adorable! F.
ReplyDeleteGreat work and thanks for the tut!
ReplyDeleteToo cute
ReplyDeleteSooo cute!!!!
ReplyDeleteThank you:-)
Emanuela
Nádherné :o)
ReplyDeleteCute! Thanks for sharing.
ReplyDeleteSo cuuuute! I'll link to my blog, if you don't mind. I will specify is yours not mine!!!!! Thanks for sharing!
ReplyDeleteOhhhhh, Thank you so much, I do!
ReplyDeleteawesome!!! i´ll try!
ReplyDeletethanks for the tutorial!
greetings from hamburg, germany
pami
Grazie per questo bellissimo tutorial!! Kiss from Italy
ReplyDeleteThese are so cute! I have a craft blog and would love for you to make a guest post if you would like to be featured! :)
ReplyDeletehttp://sew-licious.blogspot.com
Marti
Thankyou for taking the time to publish this tutorial. I really appreciate you doing this. I have just cut out some scraps ready to go. And thankyou too for answering me when I emailed you because I couldn't find the pattern on your site. I wish you peace and happiness. You have spread some joy, thankyou again.
ReplyDeleteJust found your blog a week ago, what a treat, love all the colours and inspiration... Im not good at sewing (painting is my thing) but I so have to give this a try and maybe even make a pillow for my daughter. Could also be something we could do together.
ReplyDeleteLove it!! Brilliant blog
Cute houses!
ReplyDeleteLove making these but not easy to turn. Any suggestions?
ReplyDeleteIs it possible to make the turning hole any larger? Perhaps take out a few stitches and see if that helps!
ReplyDeleteThank you very much for this lovely tutorial! Hugs
ReplyDeleteThese houses are so adorable! I have made a hair clip organizer inspired on them. I have linked you in my post!
ReplyDeleteThank you so much for sharing this great tutorial!!
Gemma, your hair clip organizer is gorgeous! I've linked to it on my FB page :) Thank you!!
ReplyDeleteI've been admiring your little houses... Thank you so much for the tutorial!
ReplyDeletevery cute, thank you for the tutorial,
ReplyDeleteso nice of you ☺
...Arrivo da ultima ...e spero che leggerai il mio commento!Il tutorial mi piace ,proverò a farlo.Posso citarti nel mio blog?Per ora GRAZIE!!!!!Sono tra i tuoi fans.Patry
ReplyDeletel LUV YOUR QUAINT SEWING THINGY'S...LOL THEY ARE ALL GORGEOUS...
ReplyDeleteAdorable is the only word for these ornaments! I think this would be the perfect gift for adult kids spending Christmas away from home! I just wanted to let you know I"m featureing this post on my frugal sewing site Sewistry next week-- Here's the link: http://sewistry.com/2013/11/free-sewing-pattern-home-holidays-christmas-ornament/ Thanks!
ReplyDeletecan these be sold on a small scale w/mention of your tutorial? thanks! i love them-they make great gifts!
ReplyDeleteADORABLE! Thank you for the pattern and tutorial!
ReplyDeleteI'm new to your blog...found you via She Can Sew!
ReplyDeleteLOVE LOVE LOVE these little houses...they are so adorable!
Thank you!!
I'm going to have a look around now :)
Kere
These are beyond adorable! LOVE!
ReplyDeletei just made a small batch of these little houses using your tutorial and they came out great. i love using scraps and this was perfect for that. seeing the combos come together was exciting. I see that you are ok with selling a product from one of your patterns, does this include your free tutorials? I would certainly credit you as the pattern maker.
ReplyDeleteThose are really cute! Shared your link on my face book page. These would make adorable pin cushions also I think.
ReplyDeletegracias por compartir!! Preciosas!!
ReplyDeleteSon hermosas. Gracias por compartir tu trabajo. They are beautiful, thanks for sharing your work.
ReplyDeleteI love these ornaments!
ReplyDeleteI have featured them today on my blog with a link back to you... www.thoughtfulcreations.wordpress.com
please come and check it out!
Happy Holidays!
-Allison
I just discovered these sweet and adorable little houses and can't wait to make some. They will add some Spring punch with all their delightful colors this wintery season! God bless and thank you.
ReplyDeleteCathy
Thanks for this great tutorial ! These houses are lovely!
ReplyDeleteJust so sweet! I love how you've used those scraps so perfectly for each house. And such a great tutorial - thanks so much for sharing. :)
ReplyDeleteThank you so much for sharing!!! I didn`t know what to do to help the Church`s Bazar and now I so happy looking for my fabrics!!!
ReplyDeleteRealy cute. I will make it ☺��
ReplyDeleteHi!
ReplyDeleteThanks so much for the tutorial. I love it!
Sue
These scrappy house ornaments don't take very long to make, and they do include a hanger, ... qornament.blogspot.com
ReplyDeleteHolidays. Well, yes, I could make these for next Christmas, but it is only April, so I'm not ready to think in that direction yet. I LOVE these tiny houses, and I think they'd make an adorable little coin purse that I can attach to a key leash inside my next lunch bag! It could stash the coins of the realm for the soda machine or my next fat quarter bundle! I could have another in my purse for the parking meter! I have many scraps and many days ahead to think of gifts, and all I'm going to want to do is make more, more and even more of these, and I'm already thinking of changes, such as one shaped like a tent for my camp-happy grandson! Thanks for the new obsession, LOL! I love this!
ReplyDeleteoh this is so great and generous! i can't wait to make one for my family!!!! i will share it on the flickr group when i make one, i'm planning this would make a good Christmas decor! I will add some haberdashery too. thank you for sharing!
ReplyDeleteThank you so much Kim ! I love your creations and i've been very glad to use your house pattern for some little Christmas gifts one month ago. I've posted pics of my own versions of your house ornaments on my blog, clemsartstudio.blogspot.com, with a link to your page. Thanks again, i've also bookmarked your blog :)
ReplyDeleteamoressssssssss lindo d+
ReplyDeleteThanks, so much!! (from Brazil)
ReplyDeletejust great seems pretty easy too...
ReplyDeleteBeautiful and amazing, I loved your little homes. Thanks for sharing this interesting tutorial with us. I will definitely try to make this at home.
ReplyDeletePlastic Suit Hangers
Thank you so much for the amazing informative, picture-laden tutorial and cute project!
ReplyDeleteI still have the one I won from you a few years ago and I love it!
ReplyDeleteThese little house ornaments are adorable. Can't wait to make some. One suggestion, though for the website, the gray shade for the text on the sight is very difficult to read, especially for these 64 year old eyes. Yes, I did just get new glasses!
ReplyDelete